
 ||||||
||||||
||||||
Assemble and program your desk clock!
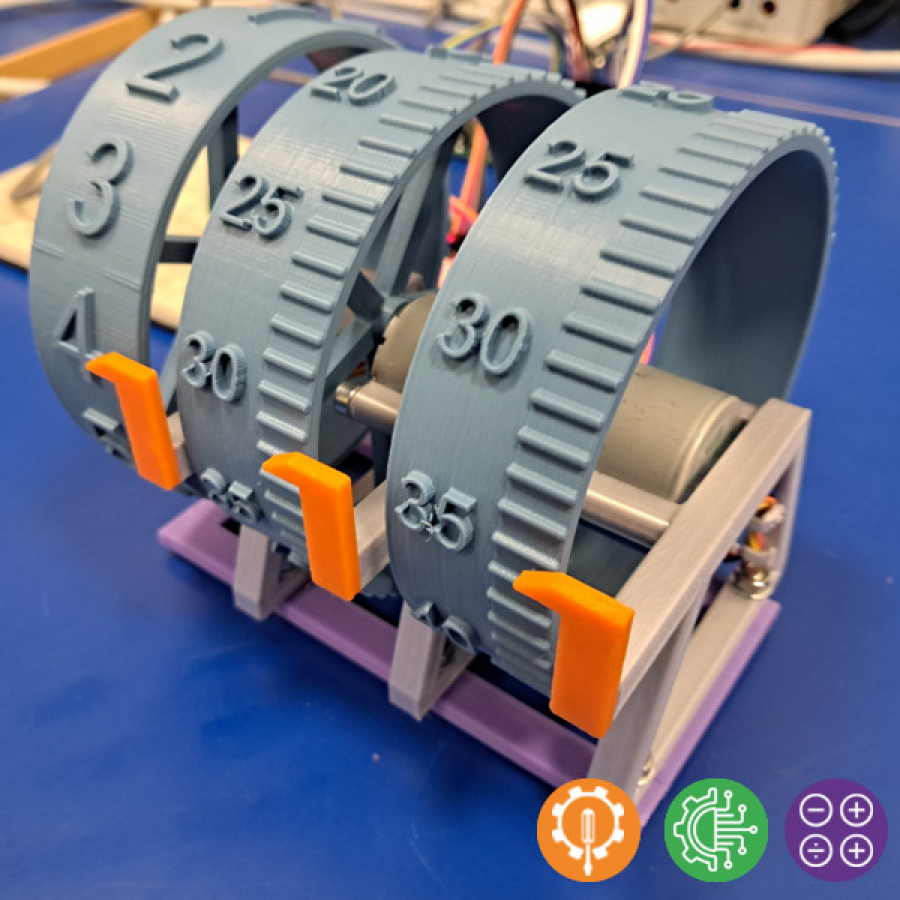
Using some 3d printable pieces, an Arduino board and three cheap stepper motors you can apply your maths and programming skills to realize an easy desk clock. You can also personalize the final result mounting the clock inside a recycled box!
To start with this project you can find here the STL files for your 3d printer, the electrical diagram and an example of the Arduino code.
Download attachments:
- 22_-_Clock.ino (399 Downloads)
- Base.stl (964 Downloads)
- Indicator.stl (953 Downloads)
- Motor Support.stl (891 Downloads)
- Wheel Hours.stl (935 Downloads)
- Wheel seconds minutes.stl (925 Downloads)
Additional Info
-
What you will learn:
- Engineering:
- - How to connect and use a stepper motor and its drive
- - How to improove your skills in 3d printing
- Math:
- - Operations in an angular system
- Technology:
- - Arduino programming using math operators, external libraries and timers
-
Expected Time:
From 5 to 10 hours
-
Materials & Recycled Materials:
- - 1x Arduino board (e.g. Arduino Uno)
- - 3x Stepper motor 28BYJ-48 4
- - 3x Stepper motor drive ULN2003
- - Dupont Cables
- - Printable filament (e.g. PLA)
- - 4x M4x15 screws with nuts and washers
- - 4x M4x10 screws
For the optional clock container:
- - A recycled box in paper, wood or metal
-
Guide:
- 1. Download and print the parts: you need 2 minutes/seconds wheels, 1 hour wheel, 3 wheels support, 1 base and 3 indicators. Suggestion for a better result: print the wheels in horizontal position using a "tree" support (available on Cura slicer)
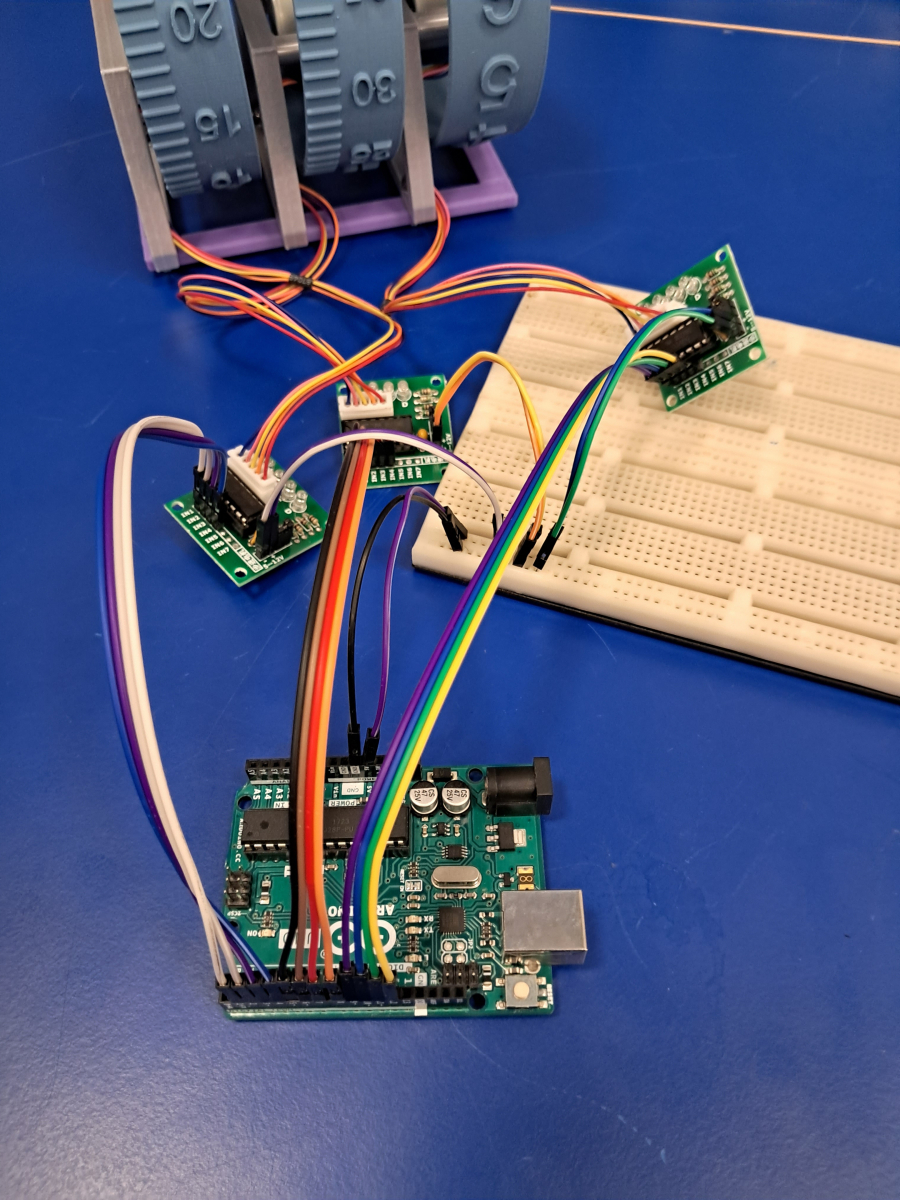
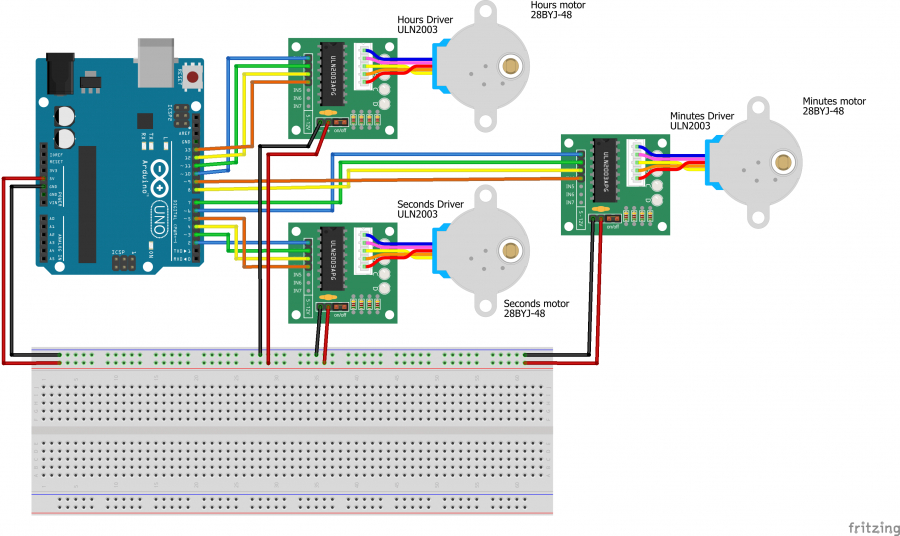
- 2. Assemble the clock following the video guide and the electrical diagram
- 3. In the Arduino IDE include a library to manage the motor drive ULN2003.In the solved exampled the used one is called "Pauna stepper", this library will manage the motor converting, for example, an angular position in the number of steps to reach it.
- 4. Declare the needed variables, for exampe a variable for the seconds, one for the minutes and one for the hours
- 5. Consider to use the millis() timer in the program instead of the normal delay function, in order to have more precision
- 6. In the Loop you have to increment the seconds counter each second and then move the seconds wheel to 1/60 of revolution. So, you have to calculate the right number of degrees (or motor step) that represent the one second movement.
- 7. After 60 seconds you have to increment the minutes counter and then move the minutes wheel to 1/60 of revolution. So, you have to calculate the right number of degrees (or motor step) that represent the one minute movement. Don't forget to restart with the seconds counter!
- 8. After 60 minutes you have to increment the hours counter and then move the hour wheel to 1/12 of revolution. So, you have to calculate the right number of degrees (or motor step) that represent the one minute movement. Don't forget to restart with the minutes counter!
- 9. Upload the program in the Arduino Board and have fun!
-
Further Steps:
If you want more fun you can:
- - Use different kinds of motors and drives and discover if there is precision differences among different solutions
- - Add a buzzer and program your alarm clock
- - Connect your Arduino Board to a NTP server and manage the clock with a external time
-
External Links:
- - How to do multiple tasks in Arduino (millis): https://www.youtube.com/watch?v=Ol6x5mjeu4w
- - How does a Stepper Motor work? https://www.youtube.com/watch?v=eyqwLiowZiU 28BYJ-48
- - Stepper motor and ULN2003 Arduino: https://www.youtube.com/watch?v=avrdDZD7qEQ
-
Software used in the project:
- - STL and STP files created using Fusion 360
- - Arduino IDE
- Difficulty level: Medium
WARNING! If you add a comment you accept the privacy policy!