

 |||||||
|||||||
|||||||
A carbon fibre heater controlled by a temperature sensor
Carbon fibres can be used in many different ways, yet they are seldom used as heating bodies. To successfully use carbon fibres as heating bodies the necessary amount of fibres is required due to their electrical resistance, which varies with the quantity and the length of the fibres. Fibres heat up rapidly; that’s why we can easily control them using a temperature sensor and PLC Arduino Uno. To set up the system, a set of products is prepared, and a basic program, which can be changed or upgraded. The electric circuit diagram of the components is also included.
- SIC_Project1_arduino_carbon_heater.ino (398 Downloads)
- SIC_Project1_elecircuit.pdf (752 Downloads)
Additional Info
-
What you will learn:
- Science:
- - the use of carbon fibres in electrical engineering
- Technology:
- - the preparation of the programming code for Arduino with a DHT 11 sensor; measuring the electrical values
- Engineering:
- - specification and connection of the electronic components; determination of carbon fibres length and density
- Math:
- - calculation of electrical values
-
Expected Time:
10h
The time needed for the activity depends on the previous knowledge. -
Materials & Recycled Materials:
- - carbon fibres (length 10cm, diameter 2.mm)
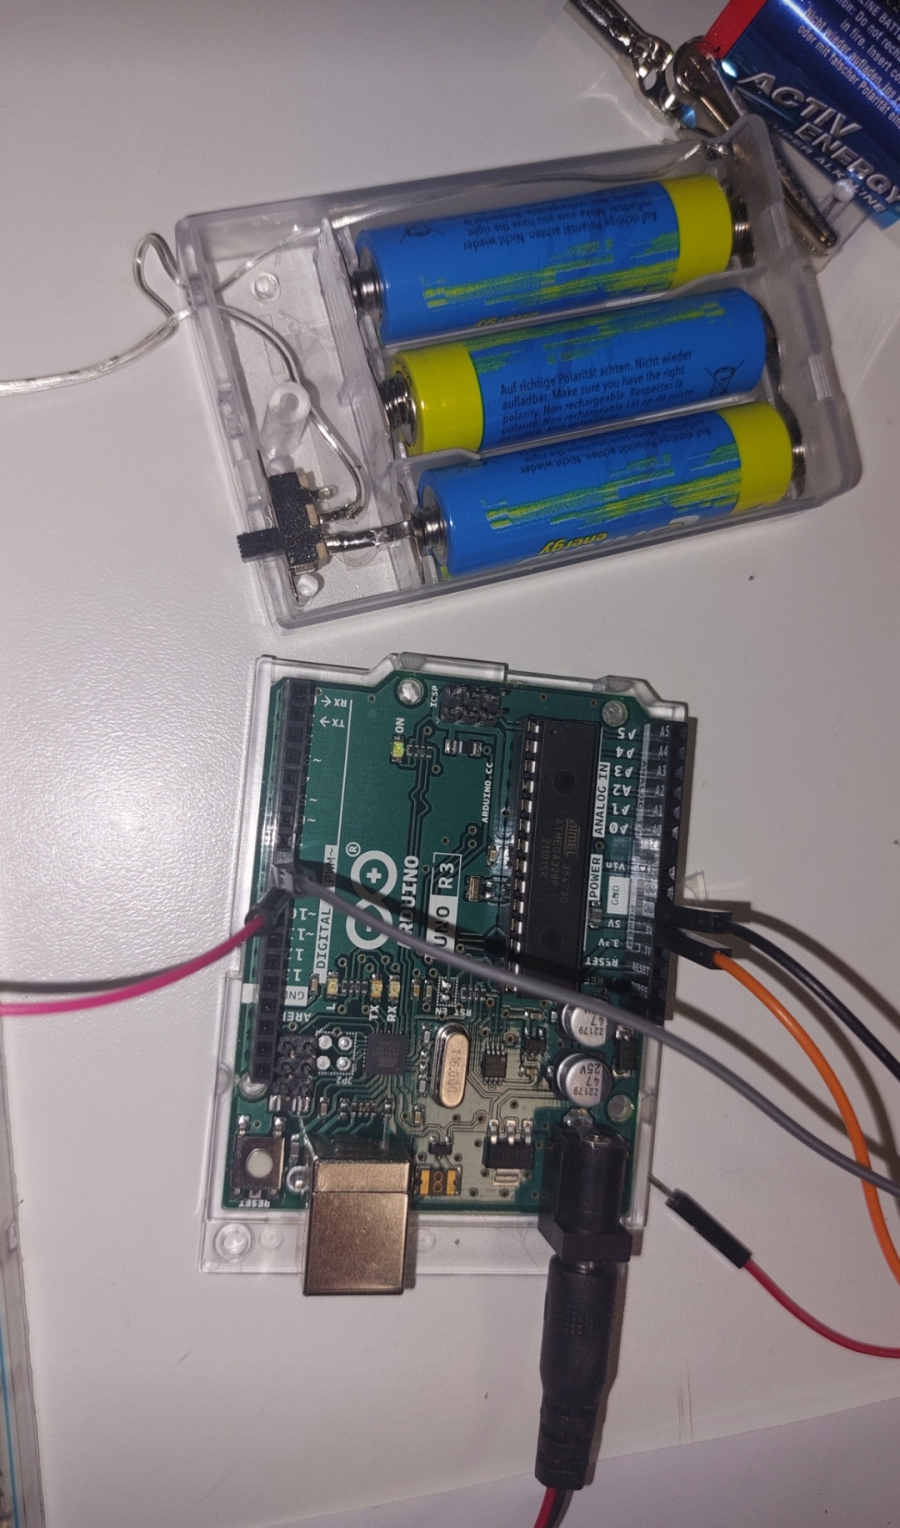
- - 1x Arduino board (e.g. Arduino Uno)
- - 1x Sensor (digital temperature humidity sensor DHT11)
- - Dupont Cables
- - AA battery box with switch (RECYCLED)
- - 3x AA batteries
- - Fabrics for the protection of carbon fibres (RECYCLED)
- - glue
- - Soldering iron + solder
- - Shrink wrap to protect the conductors
- - a temperature gauge – industrial thermometer
- - multimeter
- - Relay PE014006
- - led diode
- - resistor 200 Ohm -1kOhm
- - rubber gloves
-
Guide:
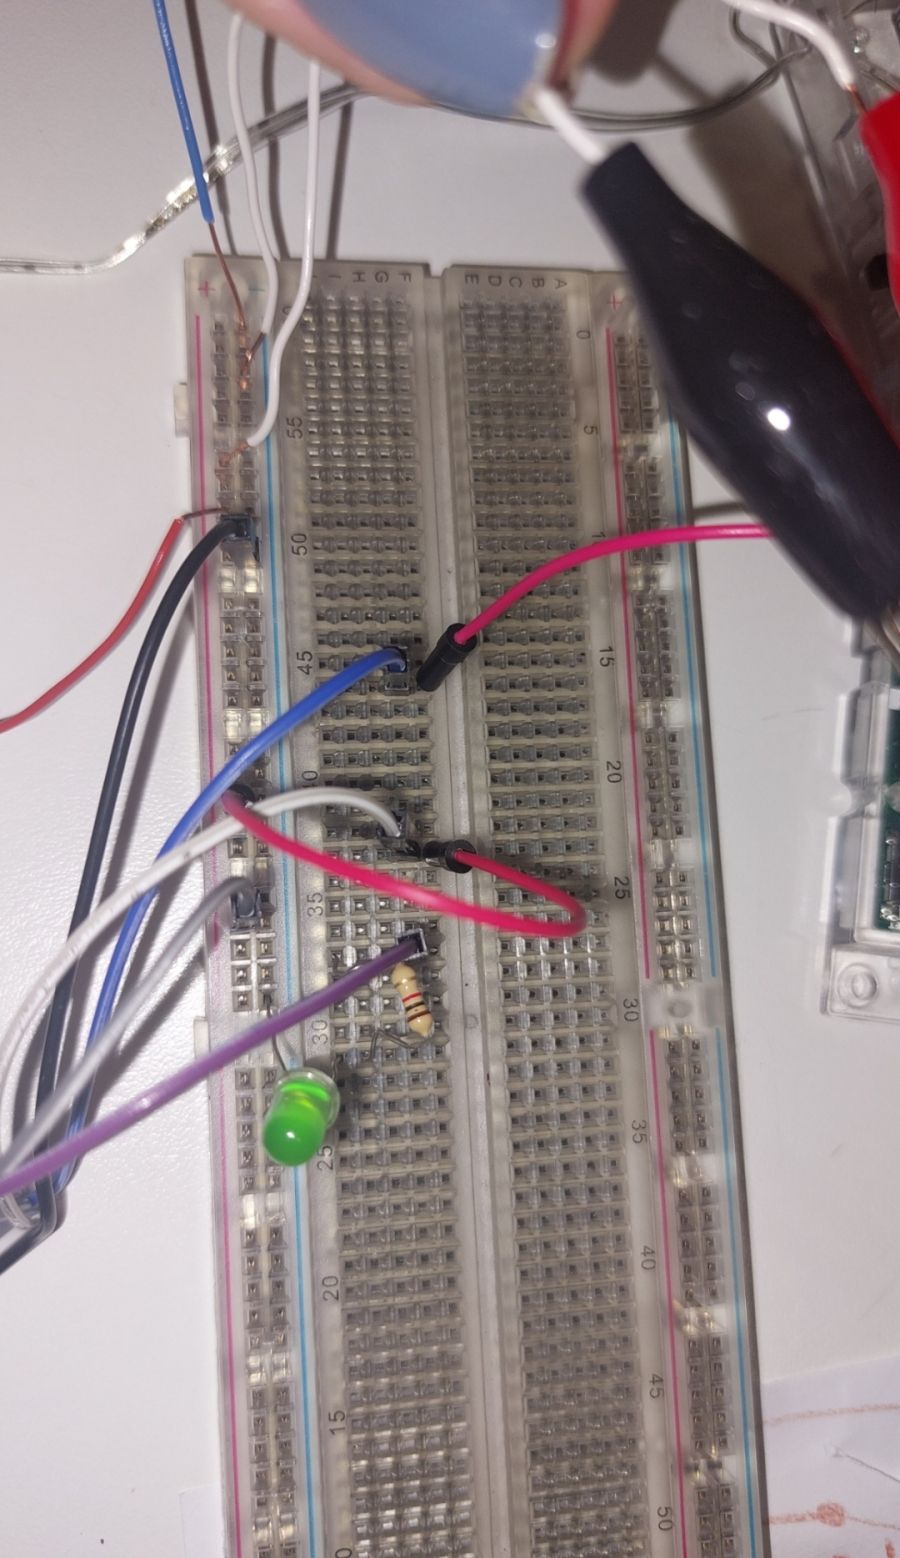
- 1 - Prepare the above stated components and on the basis of the electrical diagram built the circuit. Build the prototype of the circuit using only the led diode and a resistor. Find help in the file SIC_Project1_elecircuit.pdf
-


- 2 - When you connect the PLC to the computer, copy the programming code into the Arduino programming environment. Do not forget to define the port for PLC in the computer programme and the type of the PLC (Arduino Uno).
- 3 - Remember: always use gloves when working with carbon fibres. Carbon fibres can take the form of fabrics or tape. It’s easier to work with the carbon fibres tape.
When choosing the carbon fibres be careful as the manufacturers frequently deceive buyers by using the phrase ‘’carbon fibre look’’, which is usually glass fibres coloured black.
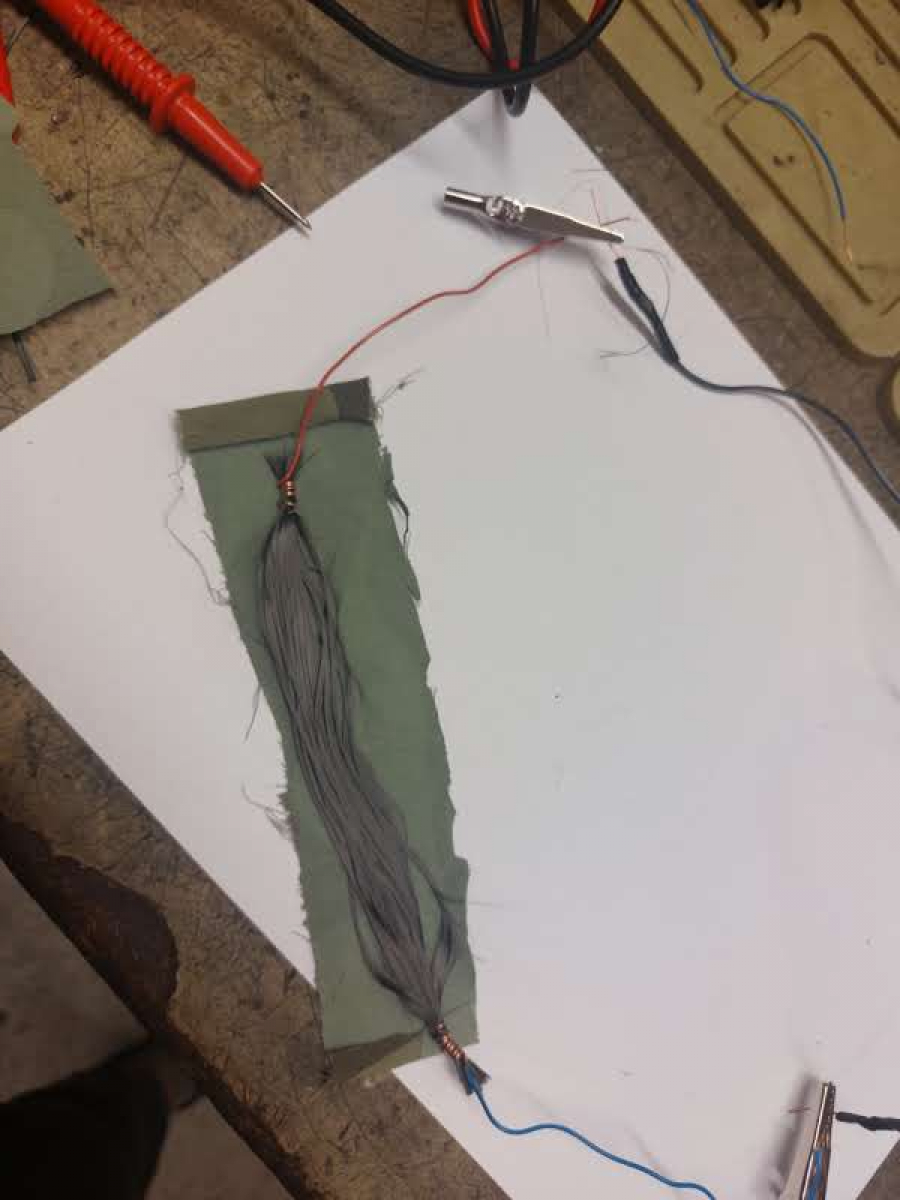
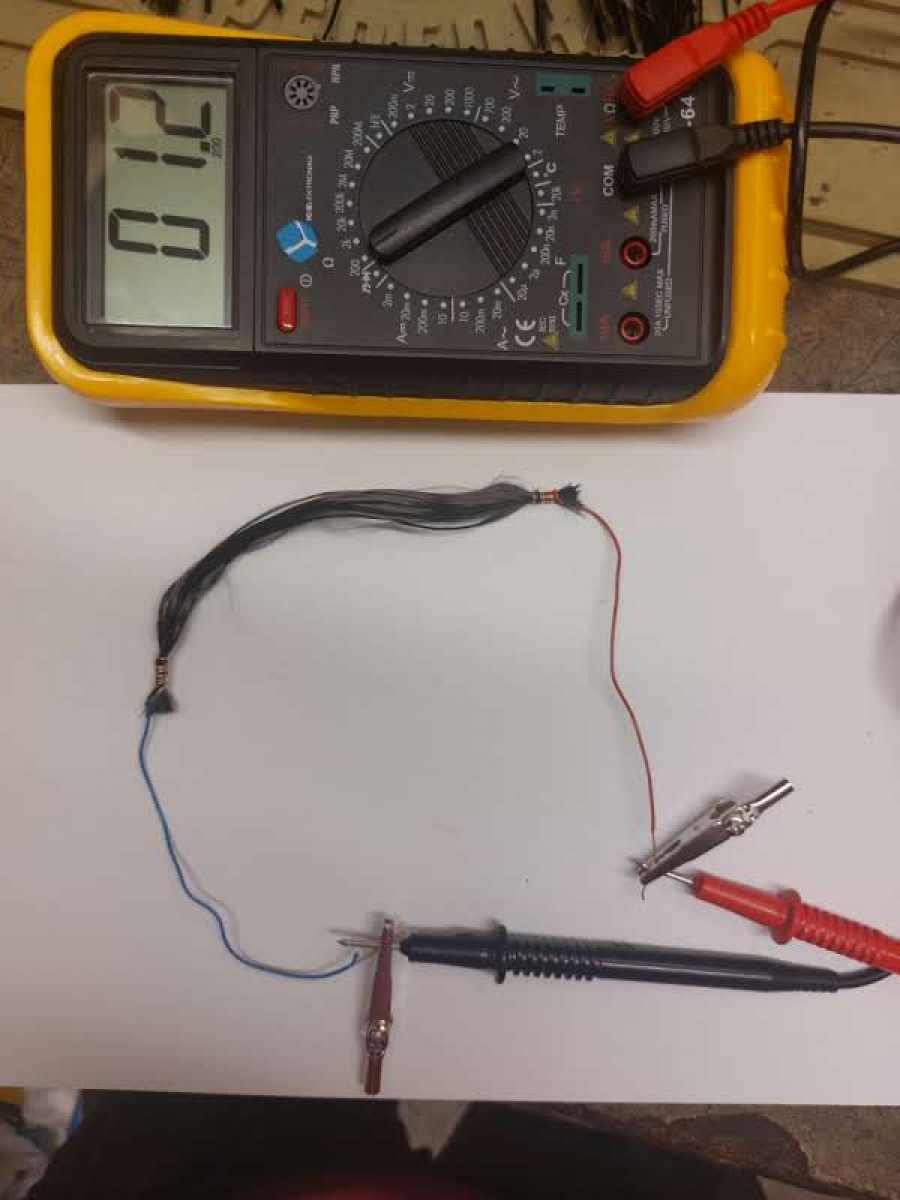
Build a heater from carbon fibres. Its resistance should be about 1 Ohm. Perform the measurement as instructed in picture

- The resistance unit depends on the length and the quantity of fibres and their structure. The fibres should be connected at each end to a wire and protected with fabrics as shown in picture

- 4 - After the carbon fibres heater element has been prepared, replace in the working circuit the led diode and the resistor with the ready carbon fibre heater.
- 5 - After a circuit has been connected the important parameters for a measurement with a multimeter are:
- current through the heater (1,4A) and
- voltage on the heater (1,4V).
On the basis of measured values you can calculate the heater’s power.
P=U*I - 6 - Using a device for measuring temperature you can check the temperature values and observe if the temperature sensor DHT11 functions properly. The change in heater’s operation is controlled by adjusting the temperature value in the programme for PLC - Arduino. The heater stops working when the temperature reaches the value set at 40°C. When the temperature sensor registers a value below the set value, the heater starts working again.
-
Further Steps:
- - the change of temperature value when the heater turns off/ on
- - the led diode will turn on when the heater is on
- - more current for more power
- - bigger amount and length of fibres for a larger heating area
- - the same source of energy for the PLC and the other parts of the circuit
- - different material for fibre protection
- - building the heater without the controller but with other electrical components (timer)
-
External Links:
How the DHT11 sensor works: https://www.circuitbasics.com/how-to-set-up-the-dht11-humidity-sensor-on-an-arduino/
Carbon fiber: https://www.sciencedirect.com/topics/materials-science/carbon-fiber-properties
Relay datseheet: https://www.te.com/usa-en/product-1393219-4.html
-
Software used in the project:
- - Arduino IDE
- Difficulty level: Medium
- Developed By: SIC Ljubljana - SL
WARNING! If you add a comment you accept the privacy policy!